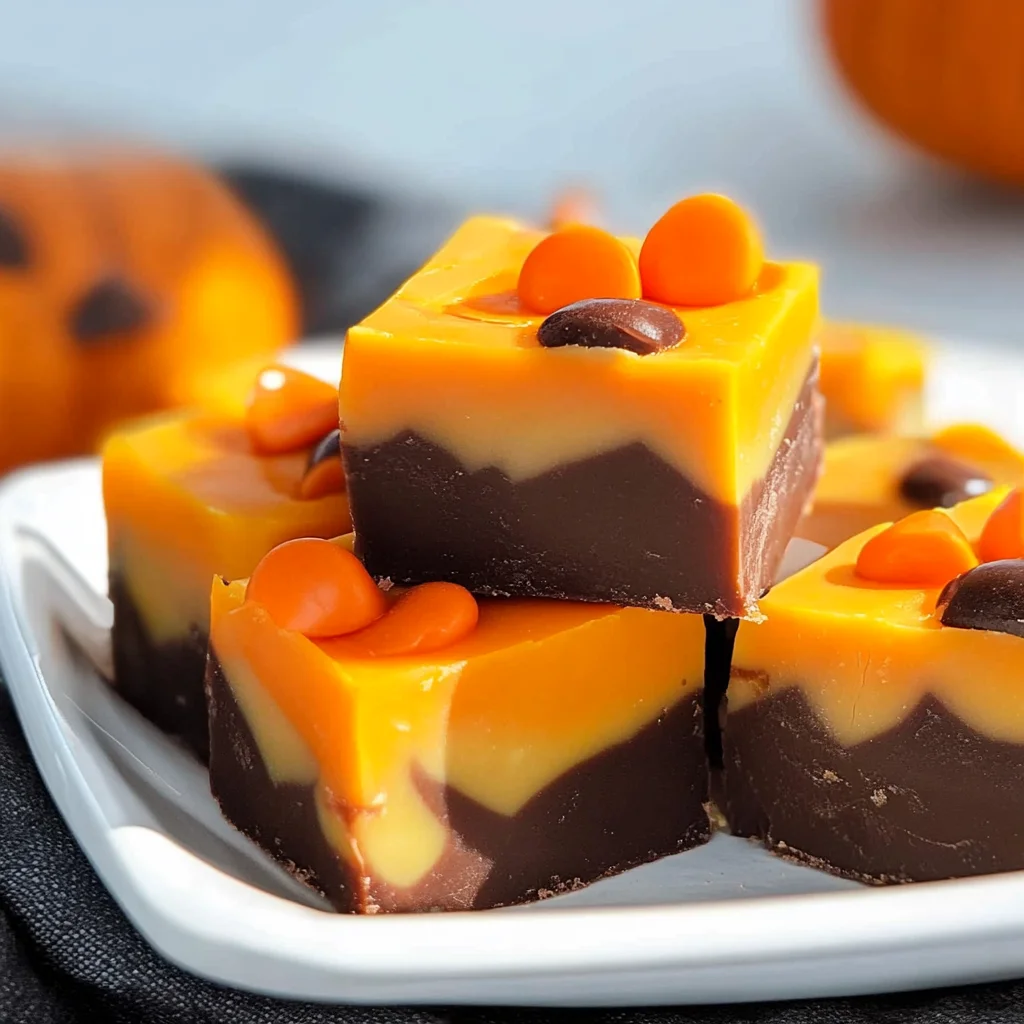
There’s something truly magical about Halloween, isn’t there? The crisp air, the rustling leaves, the adorable costumes, and of course, all the delicious treats! For me, October always brings back memories of gathering with friends, carving pumpkins, and sharing homemade goodies. And if you’re anything like me, you love a good treat that comes together in a flash, especially when you need something fun and festive without all the fuss. That’s exactly where this Halloween Fudge comes in!
This recipe isn’t just easy; it’s practically a no-brainer, and it delivers seriously impressive results. We’re talking rich, creamy, and oh-so-festive fudge that comes together with just a few ingredients and no oven required. Seriously, if you’re looking for a quick and satisfying dessert, you might also adore our Easy No-Bake Caramel Pretzel Bars – they’re another fantastic speedy option!
Why You’ll Love Halloween Fudge
- Fast: Ready in minutes, chilling time is the hardest part!
- Easy: No candy thermometer, no complicated steps – just melt and stir.
- Giftable: Perfect for Halloween parties, trick-or-treat bags, or a thoughtful hostess gift.
- Crowd-pleasing: Kids and adults alike will gobble up this festive treat!
Ingredients
- 1 ½ cups (255g) Semi-Sweet Chocolate Chips: Your classic chocolate go-to! It melts beautifully and provides a rich, dark base.
- 1 ½ cups (255g) White Chocolate Chips: We’re using these for our vibrant orange layer, so make sure they’re good quality for the best melt.
- 14 ounces (1 can) Sweetened Condensed Milk: This is the secret ingredient for that incredibly creamy, dreamy fudge texture. Don’t confuse it with evaporated milk!
- 1 teaspoon Vanilla Extract: A touch of vanilla always enhances the chocolate flavor.
- Orange Gel Food Coloring: Gel coloring is best here as it’s concentrated and won’t thin out your fudge mixture like liquid coloring can. A little goes a long way!
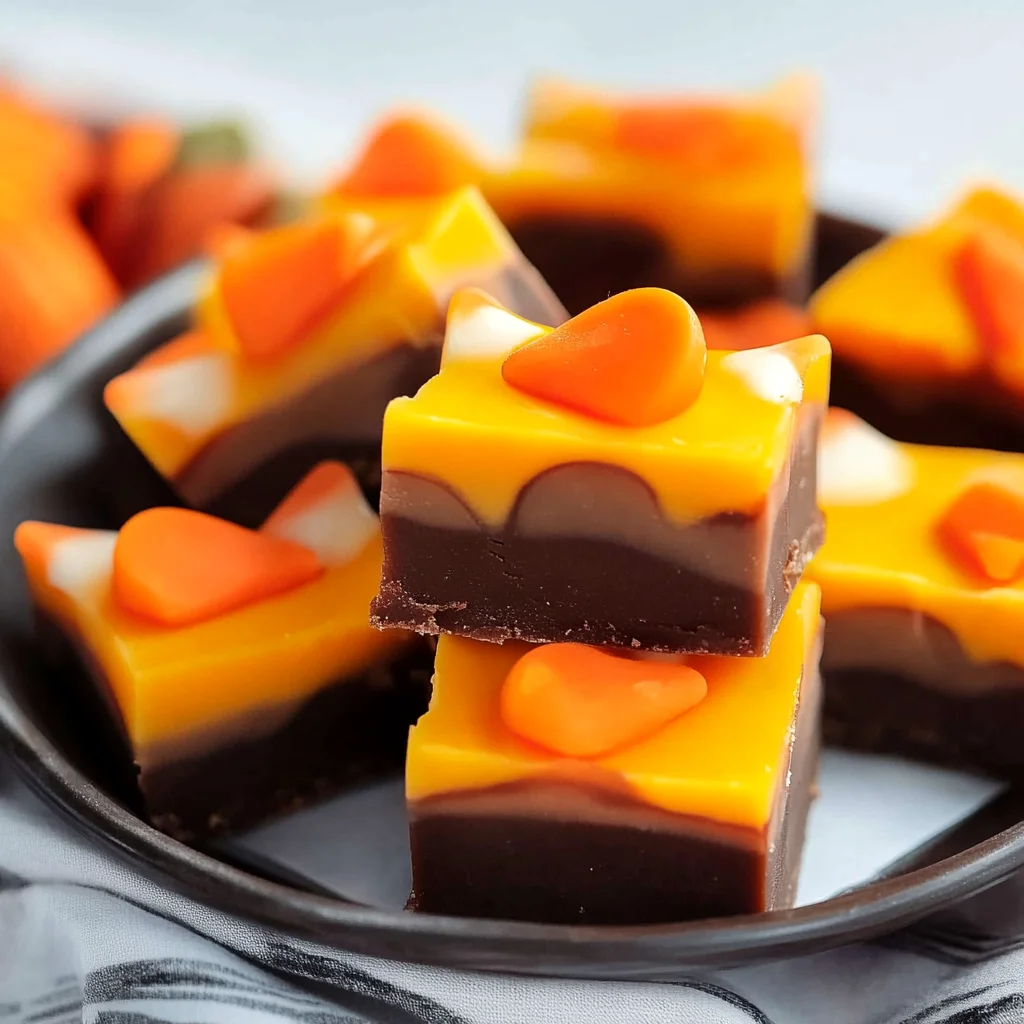
- 24 pieces Candy Corn: The quintessential Halloween candy! Perfect for a festive topping.
How to Make Halloween Fudge
Alright, let’s get to the good stuff! Get ready to whip up some Halloween magic in your kitchen.
- Prep Your Pan: First things first, grab an 8-inch square pan. Line it with foil – this makes lifting the fudge out so much easier! Then, give that foil a light spray with cooking spray. Trust me, this little step makes a huge difference later.
- Melt the Dark Chocolate: In a microwave-safe bowl, toss in your semi-sweet chocolate chips and about 5 ounces (that’s roughly half a can) of your sweetened condensed milk. Pop it into the microwave and heat it at 50% power for 1 minute. Give it a good stir. If it’s not totally smooth yet (and it probably won’t be), continue heating in 30-second bursts, stirring really well after each, until it’s perfectly melted and silky smooth. No lumps allowed!
- Add Vanilla to Dark Chocolate: Stir in ½ teaspoon of vanilla extract. That warm vanilla scent will start filling your kitchen – isn’t that just the best?
- Spread the Dark Layer: Now, pour that gorgeous semi-sweet chocolate mixture into your prepared pan. Use an offset spatula (or the back of a spoon if you don’t have one) to spread it out evenly. You want a nice, smooth layer.
- Chill Out (Layer One): Transfer your pan to the refrigerator and let it chill for about 10 minutes. This helps the bottom layer firm up enough so the orange layer doesn’t bleed into it. While it’s chilling, you could sneak a quick peek at our other chocolatey delights, like these amazing Deep Fried Oreo Cheesecake Cookies!
- Melt the White Chocolate (for Orange!): In another microwave-safe bowl, combine your white chocolate chips with the remaining 5 ounces (about half a can) of sweetened condensed milk. Just like before, heat at 50% power for 1 minute, stir, and then continue in 30-second increments, stirring until it’s completely melted and smooth. White chocolate can be a little finicky, so low and slow is key here!
- Color Your World Orange: Stir in the remaining ½ teaspoon of vanilla extract. Now for the fun part – add a few drops of orange gel food coloring. Start with a little, stir it in thoroughly, and add more if you want a deeper, spookier orange. Keep stirring until the color is uniform and vibrant!
- Layer the Orange: Carefully spread the orange white chocolate mixture evenly over your chilled semi-sweet chocolate layer. Again, use that offset spatula to make it nice and smooth.
- Decorate with Candy Corn: Don’t wait! While the orange layer is still soft, immediately press your candy corn pieces into the top. Arrange them in neat, even rows for a really polished look.
- Final Chill: Back to the refrigerator it goes! Let the fudge chill until it’s completely hardened. This usually takes at least 1-2 hours, but I often leave it longer, or even overnight, just to be sure.
- Slice and Serve: Once fully hardened, lift the fudge out of the pan using the foil liner. Peel off the foil, place the fudge on a cutting board, and slice it into squares. It’s best served at room temperature, so let it sit out for about 15-20 minutes before enjoying its creamy goodness!
Substitutions & Additions
This Halloween Fudge is wonderfully versatile! Feel free to get creative and make it your own.
- Chocolate Choices: Instead of semi-sweet, you could use milk chocolate for a sweeter base, or dark chocolate for a more intense flavor. For the top layer, colored candy melts (orange, purple, green!) would work great instead of white chocolate and food coloring.
- Flavor Extracts: Beyond vanilla, try a touch of almond extract, peppermint extract, or even a hint of rum extract for an adult twist.
- Toppings Galore: Swap out the candy corn for other Halloween candies like chopped Snickers, M&M’s (especially the Halloween mix!), crushed Oreos, spooky sprinkles, gummy worms, or mini chocolate chips. Mini pretzel pieces would add a lovely salty crunch!
- Nutty Additions: Fold in chopped pecans, walnuts, or almonds into either chocolate layer for added texture.
- Swirl It Up: Instead of distinct layers, try swirling the dark and orange chocolate together for a marbled effect! Just don’t overmix.
Tips for Success
- Don’t Overheat Chocolate: This is the most important tip! Chocolate can seize up and become grainy if it gets too hot. Heating at 50% power and stirring frequently prevents this. If you don’t have a microwave, you can use a double boiler over simmering water.
- Use Gel Food Coloring: As mentioned, gel food coloring provides intense color without adding excess liquid, which can affect the fudge’s texture.
- Chill Properly: Don’t rush the chilling process. If your fudge isn’t fully hardened, it will be messy to cut and won’t hold its shape.
- Even Layers: An offset spatula really helps achieve smooth, even layers, but a regular butter knife or the back of a spoon works too!
- Clean Cuts: For super clean slices, use a sharp knife that has been run under hot water and wiped dry before each cut. This prevents the fudge from sticking and dragging.
- Prep Ahead: This fudge is perfect for making a day or two in advance! It gives it plenty of time to set and allows you to enjoy the party without last-minute stress. Planning a big Halloween bash? Make our Holiday Antipasto Log ahead of time too, for a savory snack!
How to Store Halloween Fudge
Once your delicious Halloween Fudge is made, you’ll want to store it properly to keep it fresh and tasty!
- Countertop: You can store fudge at room temperature in an airtight container for up to 1 week. If your kitchen is particularly warm, you might notice it gets a bit softer.
- Refrigerator: For longer storage, keep it in an airtight container in the refrigerator for up to 2-3 weeks. Just remember to let it come to room temperature for about 15-20 minutes before serving for the best texture.
- Freezer: Yes, you can freeze fudge! Wrap individual pieces or the whole block tightly in plastic wrap, then place in a freezer-safe bag or container. It will last for up to 3 months. Thaw in the refrigerator overnight, then bring to room temperature before serving.
FAQs
Q: Can I use different types of chocolate?
A: Absolutely! Milk chocolate, dark chocolate, or even chocolate melts can be used. Just ensure the quantities remain the same for best results.
Q: My fudge is too soft, what happened?
A: This usually means it didn’t chill long enough, or perhaps the chocolate wasn’t fully melted and incorporated. Make sure to give it ample time in the fridge!
Q: Do I really need to use gel food coloring?
A: Gel food coloring is highly recommended because it provides vibrant color without adding extra liquid, which can change the consistency of your fudge. Liquid food coloring can make it watery.
Q: Can I make this with just one type of chocolate?
A: You could, but the dual layers add a fun visual and flavor contrast. If you only want one flavor, just double the chocolate and condensed milk for that single flavor and color as desired.
Don’t forget to follow us on Pinterest for more delicious recipes and kitchen inspiration!
Spooktacularly Easy Halloween Fudge
Ingredients
Equipment
Method
- Step 1: Prep Your Pan Grab an 8-inch square pan. Line it with foil, leaving an overhang for easy lifting. Lightly spray the foil with cooking spray.
- Step 2: Melt the Dark Chocolate In a microwave-safe bowl, combine the semi-sweet chocolate chips and about 5 ounces (roughly half a can) of the sweetened condensed milk. Heat at 50% power for 1 minute, then stir well. Continue heating in 30-second bursts, stirring thoroughly after each, until the mixture is perfectly melted and silky smooth.
- Step 3: Add Vanilla to Dark Chocolate Stir in ½ teaspoon of vanilla extract into the dark chocolate mixture.
- Step 4: Spread the Dark Layer Pour the semi-sweet chocolate mixture into your prepared pan. Use an offset spatula or the back of a spoon to spread it out into a nice, smooth, even layer.
- Step 5: Chill Out (Layer One) Transfer your pan to the refrigerator and let it chill for about 10 minutes. This helps the bottom layer firm up before adding the next layer.
- Step 6: Melt the White Chocolate (for Orange!) In another microwave-safe bowl, combine the white chocolate chips with the remaining 5 ounces (about half a can) of sweetened condensed milk. Heat at 50% power for 1 minute, stir, and then continue in 30-second increments, stirring until it's completely melted and smooth. Be careful not to overheat white chocolate.
- Step 7: Color Your World Orange Stir in the remaining ½ teaspoon of vanilla extract into the white chocolate mixture. Add a few drops of orange gel food coloring. Start with a little, stir thoroughly, and add more if you want a deeper, more vibrant orange color.
- Step 8: Layer the Orange Carefully spread the orange white chocolate mixture evenly over your chilled semi-sweet chocolate layer. Use an offset spatula to make it nice and smooth.
- Step 9: Decorate with Candy Corn While the orange layer is still soft, immediately press your candy corn pieces into the top. Arrange them in neat, even rows for a polished, festive look.
- Step 10: Final Chill Return the pan to the refrigerator and let the fudge chill until it's completely hardened. This usually takes at least 1-2 hours, but leaving it longer or even overnight is recommended for best results.
- Step 11: Slice and Serve Once fully hardened, lift the fudge out of the pan using the foil liner. Peel off the foil, place the fudge on a cutting board, and slice it into squares. For super clean cuts, use a sharp knife that has been run under hot water and wiped dry before each cut. It’s best served at room temperature, so let it sit out for about 15-20 minutes before enjoying its creamy goodness!