There’s just something magical about the smell of apples and cinnamon baking in the oven, isn’t there? It instantly transports me back to my grandma’s kitchen, where every season had its special dessert. As the leaves start to turn, or even if you’re just dreaming of cooler weather, there’s one treat that always calls my name: a classic, comforting apple crumble. Forget complicated pies; this recipe is all about pure, simple joy. It’s so incredibly easy to whip up, you’ll wonder why you ever waited!
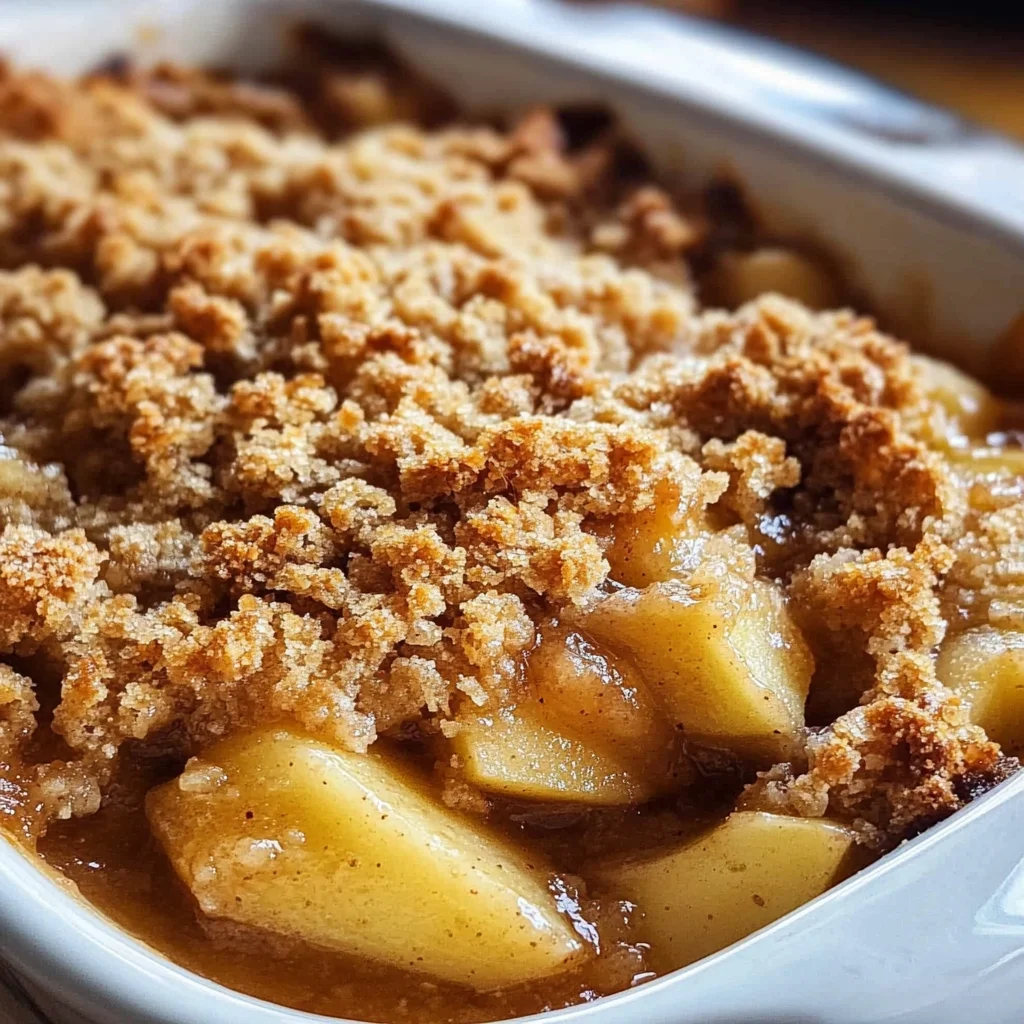
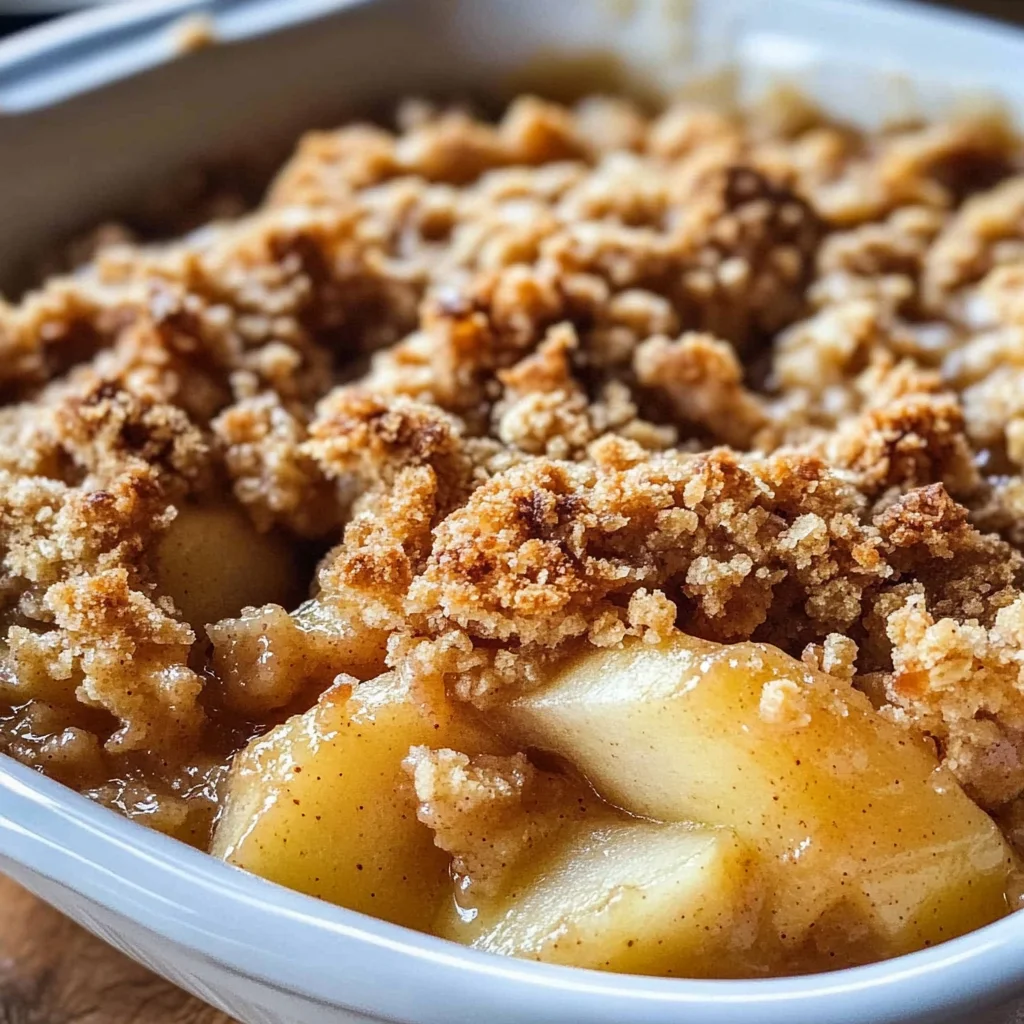
This isn’t just any old apple crumble; it’s the apple crumble you’ll want to make again and again. It’s truly memorable, marrying tender, spiced apples with a buttery, oat-filled crisp topping that everyone absolutely adores. Get ready to fill your home with the most inviting aromas!
Why You’ll Love This Homemade Apple Crumble
- Fast: Seriously, from prep to oven, it’s quicker than you think! Perfect for those last-minute dessert cravings.
- Easy: No fancy techniques, just simple mixing and baking. Even a beginner baker can nail this!
- Giftable: A warm crumble in a cute dish makes the perfect hostess gift or a thoughtful treat for neighbors.
- Crowd-pleasing: Everyone, from kids to grown-ups, adores this classic comfort dessert. It’s always a hit!
Ingredients for Your Perfect Apple Crumble
Here’s what you’ll need to create this comforting masterpiece. Most of these are probably already in your pantry!
- 6 large apples, peeled, cored, and sliced: I love using a mix of sweet and tart, like Honeycrisp and Granny Smith, for the best flavor balance!
- 1 tablespoon lemon juice: This little hero keeps those apple slices from browning and adds a touch of brightness to the filling.
- 1/2 cup granulated sugar: Just enough sweetness for the apple filling, letting the natural apple flavor shine.
- 1 teaspoon ground cinnamon: The ultimate warm spice partner for apples – essential for that cozy aroma!
- 1/4 teaspoon ground nutmeg: Adds that extra layer of deep, comforting spice that truly complements the cinnamon.
- 1 cup all-purpose flour: The simple, sturdy base for our irresistibly crumbly topping.
- 1/2 cup rolled oats: Gives the topping a wonderful chewy texture and a rustic, wholesome charm.
- 1/2 cup packed brown sugar: For that deep, caramel-y sweetness and moisture in the crumble topping.
- 1/2 cup cold unsalted butter, cut into small cubes: Keeping it cold is absolutely key for achieving that perfect, flaky crumble texture!
- Pinch of salt: Don’t skip it! A tiny bit of salt enhances all the sweet and spicy flavors, making them pop.
How to Make the Coziest Apple Crumble, Step by Step
Alright, friend, let’s get baking! You’re just a few simple steps away from a house filled with the most incredible aroma and a dessert that will make everyone smile.
- Get Your Oven Ready: First things first, go ahead and preheat your oven to a nice cozy 350°F (175°C). While that’s warming up, you can start on the apple magic!
- Prep the Apples: Grab a big mixing bowl. Toss in your beautifully peeled, cored, and sliced apples. Now, drizzle them with the lemon juice, sprinkle in the granulated sugar, cinnamon, and nutmeg. Give it all a good gentle toss until every apple slice is glistening and evenly coated. Oh, the anticipation!
- Fill Your Dish: Take that delicious apple mixture and spoon it into a greased 9-inch baking dish. Spread it out evenly – we want every bite to be perfectly balanced with apples and spice.
- Whip Up the Crumble Topping: In another, separate bowl (it’s okay, we’re doing a little bowl dance today!), combine your all-purpose flour, rolled oats, packed brown sugar, and that little pinch of salt. Give it a quick whisk to mix everything up thoroughly.
- Add the Butter: Now for the fun part! Add your cold butter cubes to the dry flour mixture. Here’s my favorite technique: use your fingertips or a pastry cutter to really work that butter into the dry ingredients. You’re aiming for a mixture that looks like coarse crumbs, almost like wet sand. Don’t overmix! Those little pockets of butter are what create steam during baking, resulting in a wonderfully tender and delicious crumble.
- Top It Off: Generously sprinkle that amazing crumble topping evenly over the apples in your baking dish. Make sure you get good coverage – that golden, crunchy topping is half the fun!
- Bake to Perfection: Pop your dish into the preheated oven. Bake for about 40-45 minutes. You’ll know it’s ready when the topping is a beautiful golden brown and the apples underneath are super tender when you poke them with a fork. Your kitchen is going to smell heavenly!
- Cool Down (a Little!): It’s tempting, I know, but try to let it cool slightly before serving. This lets the filling set up a bit, making it easier to serve and preventing burnt tongues. But honestly, a little warm is the absolute best way to enjoy it!
Fun Substitutions & Delicious Additions to Your Apple Crumble
One of the best things about a classic like apple crumble is how forgiving and versatile it is! You can easily tweak it to your taste or what you have on hand. Here are some ideas to make it your own:
- Different Fruits: Not an apple-only kind of day? You could totally swap in pears, peaches (especially when they’re fresh and juicy in the summer!), or even a mix of berries. A mixed berry crumble is a fantastic twist! For a delightful peachy twist, you might even like our Easy Peach Cobbler Dump Cake Recipe too. And if you’re a fan of fruit and cream cheese desserts, you definitely have to try our Easy Lemon Blueberry Cheesecake Cake for another crowd-pleaser.
- Nutty Crunch: Add 1/2 cup of chopped pecans, walnuts, or almonds to your crumble topping for an extra layer of texture and rich flavor.
- Spice It Up: A pinch of ground ginger, allspice, or a tiny dash of cardamom can add another intriguing dimension to your apple filling.
- Caramel Drizzle: A swirl of warm caramel sauce over the top right before serving? Absolute heaven!
- Vanilla Bean: Scrape half a vanilla bean into your apple mixture for an extra-gourmet touch that truly elevates the flavor.
- Citrus Zest: A little orange or lemon zest either in the apple mixture or subtly mixed into the topping can brighten everything up beautifully.
Pro Tips for Your Best Apple Crumble Ever
Even though this recipe is super easy, a few little tricks can make it absolutely stellar:
- Choose Your Apples Wisely: As I mentioned, a mix of tart (like Granny Smith) and sweet (like Honeycrisp, Fuji, or Gala) gives the most balanced and interesting flavor. Firmer apples hold their shape better during baking.
- Don’t Overmix the Topping: The key to a truly crumbly, tender topping is to work the butter in just until coarse crumbs form. Overmixing can develop the gluten in the flour, leading to a tougher, more dough-like texture.
- Cold Butter is Crucial: Seriously, keep that butter as cold as possible! It creates pockets of steam during baking, which results in those delightful, light, and flaky crumbles that everyone loves.
- Slice Apples Uniformly: Aim for slices of roughly the same thickness. This ensures they cook evenly, so you don’t end up with some crunchy and some mushy apples.
- Serving Suggestion: A generous scoop of vanilla bean ice cream, a dollop of fresh whipped cream, or a silky drizzle of homemade custard is practically mandatory with warm apple crumble. Just saying, it takes it from delicious to divine!
- Prep Ahead: You can peel and slice your apples and toss them with the lemon juice up to a day in advance (store in an airtight container in the fridge to prevent browning). You can also make the crumble topping ahead of time and keep it in the fridge or freezer until you’re ready to bake. This makes assembly a breeze, especially if you’re planning a full dinner party and need to save some time for other delicious Crispy Kitchens recipes!
How to Store Your Leftover Apple Crumble (If There Is Any!)
If by some miracle you have any apple crumble left (it’s rare, I know, especially when it smells this good!), here’s how to keep it fresh and delicious for another day:
- Room Temperature: You can leave your apple crumble covered lightly at room temperature for up to 1 day. Just make sure it’s in a cool, dry spot.
- Refrigeration: For longer storage, cover the baking dish tightly with plastic wrap or transfer any leftover crumble to an airtight container. It will keep beautifully in the refrigerator for 3-4 days.
- Reheating: To reheat, scoop out a portion and warm it gently in the microwave for a minute or two. For a crispier topping, you can pop the whole dish (if it’s oven-safe, like glass or ceramic) back into a 300°F (150°C) oven for 15-20 minutes until warmed through and the topping is crisp again.
- Freezing: Yes, you can freeze apple crumble! Bake it completely, let it cool entirely, then wrap it tightly first in plastic wrap and then in aluminum foil. It will keep in the freezer for up to 3 months. Thaw overnight in the fridge and then reheat as described above. You can also freeze the unbaked apple mixture and the topping separately for future baking!
Frequently Asked Questions About Apple Crumble
What kind of apples are best for apple crumble?
A mix is usually best! I love combining tart apples like Granny Smith with sweeter, firmer varieties such as Honeycrisp, Gala, or Fuji. This gives you a great balance of flavor and texture that holds up well during baking, ensuring your crumble isn’t too sweet or too tart, and not too mushy.
Can I make apple crumble ahead of time?
Absolutely! You can prepare the apple filling and the crumble topping separately and store them in airtight containers in the fridge for up to 24 hours. Assemble and bake just before you want to serve for the freshest results. You can even bake the whole thing, let it cool completely, and then gently reheat it when you’re ready to enjoy.
Why is my apple crumble topping not crispy?
This usually happens if your butter wasn’t cold enough when you mixed it in, or if the topping was overmixed, making it more like a dough rather than distinct crumbs. Make sure your butter is well-chilled and you only mix until coarse crumbs form. Also, double-check that your oven is at the correct temperature for proper browning!
Is apple crumble the same as apple crisp?
They’re very similar and often used interchangeably! The main difference is that an apple crisp typically includes oats (which this recipe does) and sometimes nuts in its topping, creating a ‘crisper’ texture. Crumbles, on the other hand, usually feature a simpler, streusel-like topping made from just flour, sugar, and butter, resulting in a more ‘crumbly’ texture. My recipe is a delicious hybrid, giving you the best of both worlds with that delightful oat crunch!
Don’t forget to follow us on Pinterest for even more mouth-watering recipes and kitchen inspiration!

Homemade Apple Crumble
Ingredients
Equipment
Method
- Step 1: Get Your Oven Ready: Preheat your oven to a nice cozy 350°F (175°C).
- Step 2: Prep the Apples: In a large mixing bowl, toss your peeled, cored, and sliced apples with lemon juice, granulated sugar, cinnamon, and nutmeg until evenly coated.
- Step 3: Fill Your Dish: Spoon the apple mixture into a greased 9-inch baking dish and spread it out evenly.
- Step 4: Whip Up the Crumble Topping: In a separate bowl, combine all-purpose flour, rolled oats, packed brown sugar, and a pinch of salt. Whisk to mix thoroughly.
- Step 5: Add the Butter: Add your cold butter cubes to the dry flour mixture. Use your fingertips or a pastry cutter to work the butter into the dry ingredients until the mixture looks like coarse crumbs, almost like wet sand. Do not overmix.
- Step 6: Top It Off: Generously sprinkle the crumble topping evenly over the apples in your baking dish.
- Step 7: Bake to Perfection: Bake in the preheated oven for about 40-45 minutes, or until the topping is golden brown and the apples underneath are super tender when poked with a fork.
- Step 8: Cool Down (a Little!): Let the crumble cool slightly before serving to allow the filling to set up.