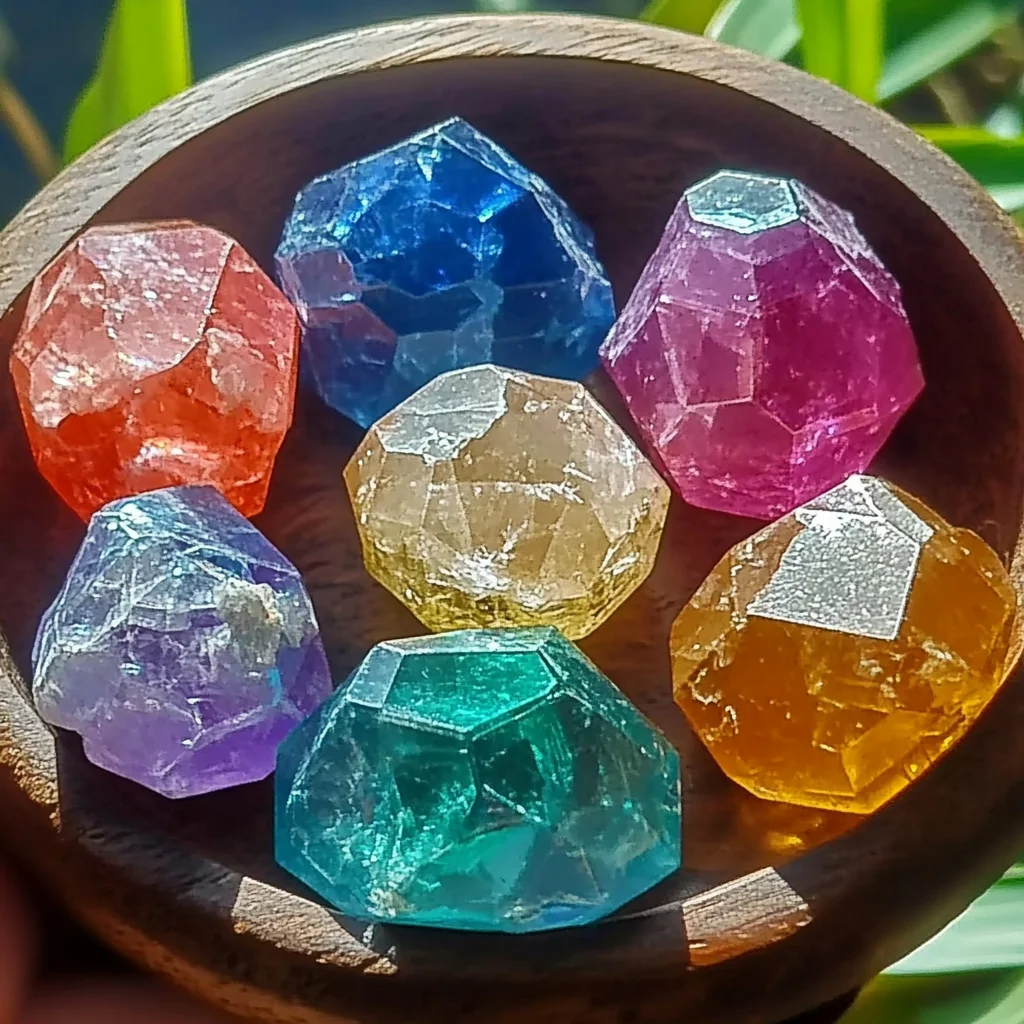
Hey there, friends! Do you ever find yourself longing for those simple, wonder-filled days of childhood? You know, the ones where discovering a sparkly rock felt like unearthing a true treasure, or mixing up “potions” in the backyard convinced you were a real alchemist? Well, get ready to tap into that pure joy because today, we’re not baking up a treat to eat, but rather a recipe for magic! We’re making the most adorable, fizz-tastic, color-changing crystal treasure stones that are guaranteed to bring a sparkle to anyone’s eye. And trust me, it’s just as easy and satisfying as whipping up your favorite dessert!
This isn’t just a craft; it’s an experience! These little gems are surprisingly simple to create, quick to assemble, and the anticipation of seeing them fizz and change colors is truly memorable. Whether you’re looking for a fun afternoon activity with the kids, a unique gift idea, or just a little whimsical project for yourself, these crystal treasure stones are an absolute winner. Get ready to sprinkle a little enchantment into your day!
Why You’ll Love Color Changing Crystal Treasure Stones
- Fast
- Easy
- Giftable
- Crowd-pleasing
Ingredients
- 1/2 cup baking soda: The star of our show, ready to create some fizzy magic!
- 1/4 cup water: Just enough to bring everything together into a perfect paste.
- Food coloring (multiple colors): This is where the fun really begins! Grab all your favorite vibrant shades to make a rainbow of treasures.
- Optional: Vinegar: For that grand finale fizzy reaction – trust me, it’s worth it!
- Optional: Glitter: Because who doesn’t love a little extra sparkle?
How to Make Color Changing Crystal Treasure Stones
Alright, let’s get our hands a little messy and start crafting these wondrous gems! This is where you become the alchemist, turning simple ingredients into sparkling wonders. Just like how you might follow a recipe for a delicious easy peanut butter cup dump cake, we’ll follow these steps for a different kind of sweet satisfaction.
First things first, grab your mixing bowl. You’re going to measure out 1/2 cup of baking soda and gently place it in the bowl. This white powder is the foundation of our treasure!
Next, carefully pour in 1/4 cup of water. Now, here comes the fun part – mixing! Grab a spoon or a spatula and really get in there. You want to mix it thoroughly until you’ve got a thick, uniform paste. It should feel like damp sand that can hold its shape. If it’s too crumbly, add a tiny splash more water; if it’s too wet, a little more baking soda will do the trick. Trust your instincts!
Once you have your perfect paste, it’s time to bring on the color! Divide your baking soda paste into separate small bowls. You’ll want one bowl for each color you plan to make. I usually aim for at least three different colors for a vibrant collection, but the sky’s the limit!
Now, add a few drops of your chosen food coloring to each bowl. Start with just a couple of drops and mix it in. You can always add more to get a deeper, richer hue. Stir, stir, stir until the color is beautifully and evenly blended throughout the paste. This is where your treasures really start to come to life!
With your colorful pastes ready, it’s time to shape them! Scoop out portions of the colored paste. You can use your hands, small spoons, or even cookie cutters to mold them into whatever “treasure” shape you desire. Think irregular stone shapes, faceted gems, or even little hearts or stars. Get creative! As you shape them, place your finished stones onto a parchment-lined baking sheet. This makes for easy cleanup and ensures they won’t stick.
The hardest part of this entire process is waiting, my friends! You need to allow your beautiful creations to air dry for several hours, or even better, overnight. They need to be completely hardened and dry to the touch. This step is crucial, so don’t rush it! While you’re waiting for your treasures to dry, it’s the perfect time to make some easy no-bake caramel pretzel bars for a sweet snack.
Once your crystal treasure stones are completely dried and hard, they’re ready for their grand reveal! You can simply admire them as is, or for that truly magical, color-changing moment, grab some vinegar. Drizzle a little vinegar over each stone and watch the amazing fizzing reaction as the colors combine and swirl! It’s like a mini science experiment right on your kitchen counter!

Substitutions & Additions
- Glitter Galore: For extra sparkle, mix in a pinch of edible glitter (or craft glitter if they’re purely decorative) with your food coloring. Imagine iridescent gems!
- Scented Stones: Add a drop or two of essential oil (like lavender or citrus) to the paste for scented treasure stones. Perfect for a calming sensory experience!
- Mold Mania: Instead of hand-shaping, try using small silicone candy molds or ice cube trays to create perfectly uniform shapes. Just press the paste in, level, and pop them out once dry.
- Natural Colors: Want to skip the artificial food coloring? Try using natural powders like turmeric for yellow, spirulina for green, or beet powder for pink. The colors might be more subtle, but equally charming!
Tips for Success
- Consistency is Key: The paste should be firm enough to hold its shape but not crumbly. If it’s too wet, your stones might take forever to dry and won’t be as sturdy. Too dry, and they’ll be hard to mold. Adjust with small increments of water or baking soda until it feels just right.
- Patience, Young Alchemist: Don’t rush the drying process! If your stones aren’t completely hard, they’ll crumble when you try to handle them or react with the vinegar. A warm, dry spot is ideal for drying.
- Keep Colors Separate: When adding food coloring, make sure your mixing spoons are clean between colors, or you’ll end up with murky browns and greens instead of vibrant individual shades.
- Prep Ahead: These are fantastic to make a day or two in advance for a party activity or gift. Just store them in an airtight container until you’re ready for the fizzing fun!
How to Store Color Changing Crystal Treasure Stones
Once your magical crystal treasure stones are completely dry and hardened, they’re super easy to store! Just pop them into an airtight container or a Ziploc bag. Keep them in a cool, dry place away from any moisture. Stored properly, they’ll maintain their integrity (and their fizzing power!) indefinitely, ready for you to enjoy whenever a little magic is needed. Just don’t let them get wet before you’re ready for the big reveal, or you’ll trigger the fizzing prematurely!
FAQs
Q: Can I use liquid watercolors instead of food coloring?
A: You can, but be mindful of the water content. Liquid watercolors tend to be thinner than food coloring gels or drops, so you might need to add a tiny bit more baking soda to maintain the paste consistency.
Q: What if my stones are still soft after drying overnight?
A: This usually means they still have too much moisture. Give them more time to dry, possibly in a sunnier or warmer spot, or even near a fan to help circulate air. They need to be completely rock-hard.
Q: Can I bake them to speed up drying?
A: While theoretically possible at a very low temperature, air drying is generally recommended. Baking soda can sometimes react unpredictably with heat, and you don’t want to accidentally bake out the fizzing potential!
Q: Is the vinegar reaction safe for kids?
A: Absolutely! The baking soda and vinegar reaction is a classic, safe, and non-toxic science experiment. It’s always fun for little ones to watch the fizzy magic happen. Just supervise them, especially with the vinegar, to avoid splashes in eyes.
For more delightful recipes and kitchen inspiration, be sure to follow us on Pinterest!