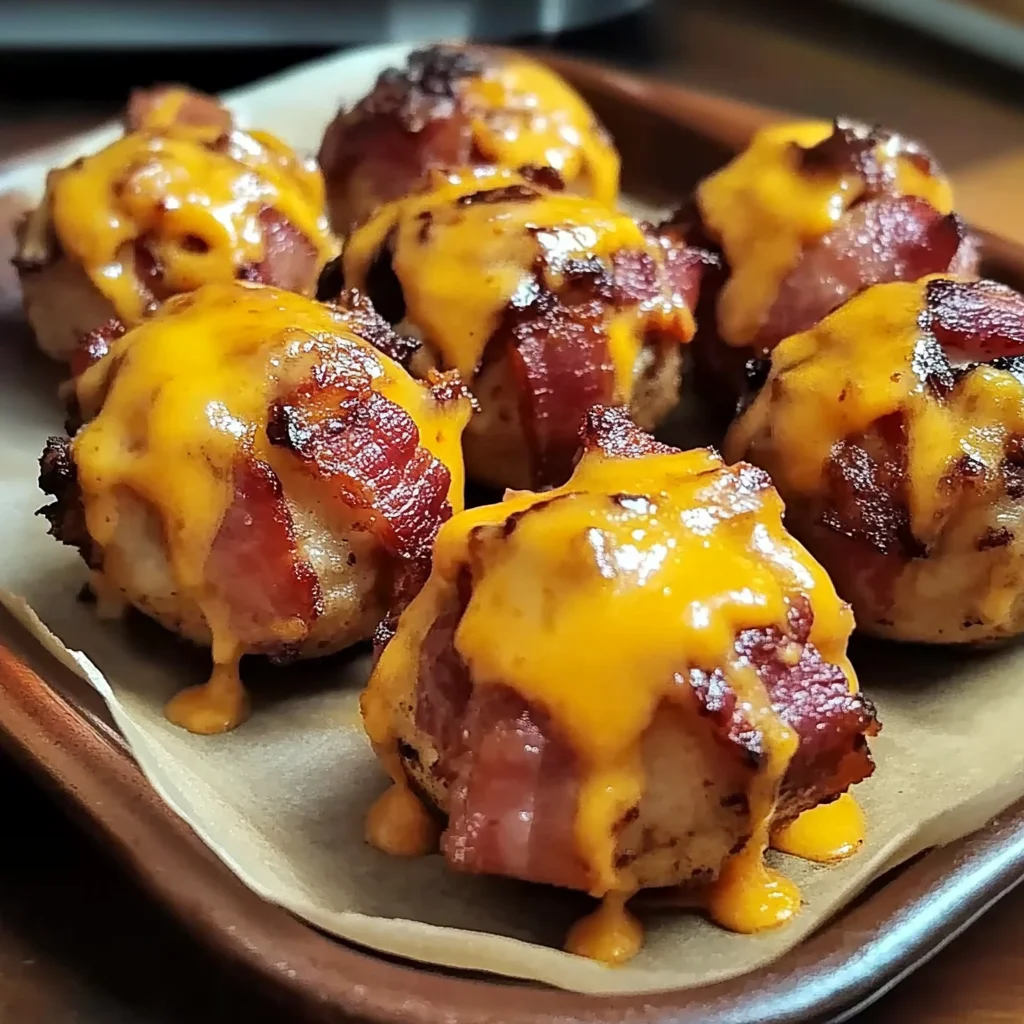
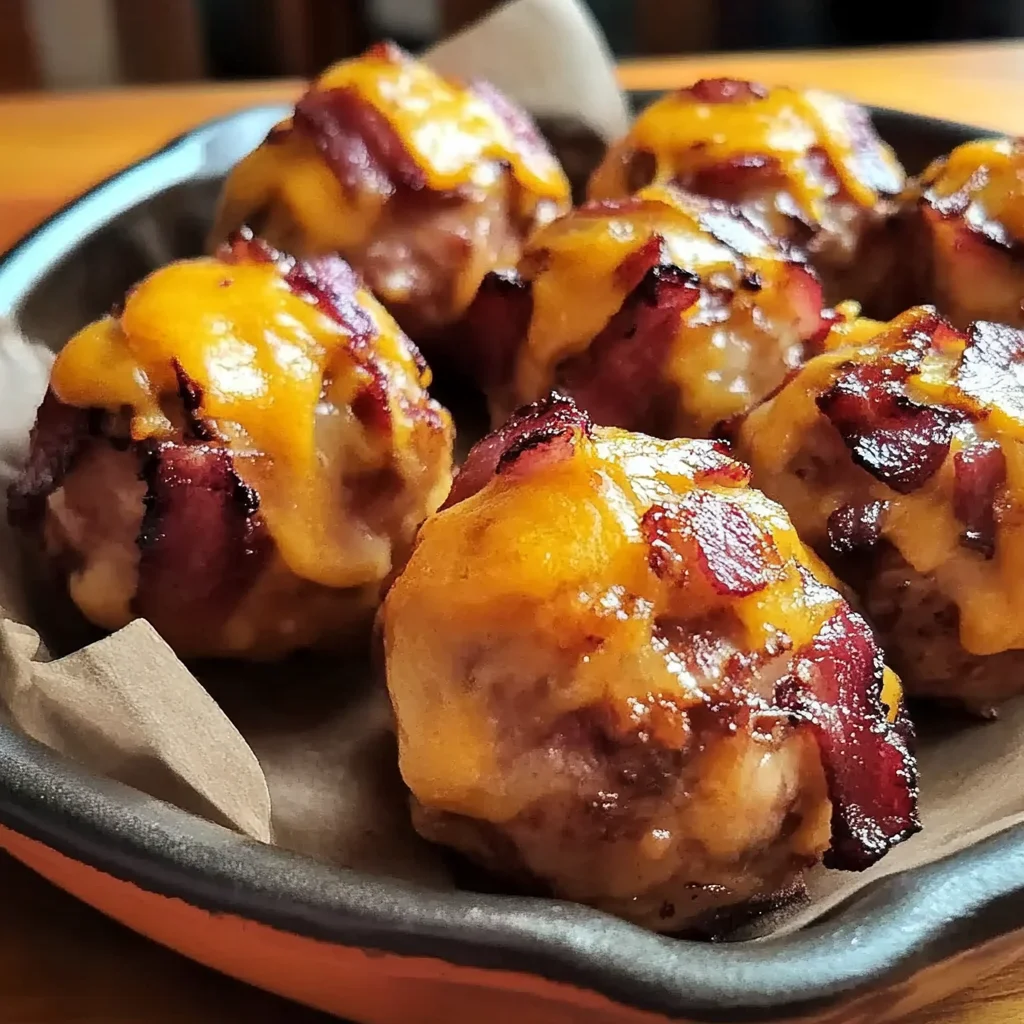
Oh, friend, do you ever get that craving for something incredibly satisfying, something that just screams “comfort food” but is still super easy to whip up? I totally get it! For me, that feeling often hits when I’m thinking about laid-back evenings, game nights, or just a casual get-together with loved ones. And that’s exactly where these Cheesy BBQ Bacon Bombs blast their way into your heart! They bring back memories of cozy gatherings, amazing smells wafting from the kitchen, and everyone reaching for “just one more.” They’re truly one of those recipes that everyone asks for, and you’ll love how quick and memorable they are to make.
Why You’ll Love Cheesy BBQ Bacon Bombs
- Fast: From mixing bowl to oven, these come together in a flash. Perfect for when hunger strikes or guests are arriving!
- Easy: No complicated techniques here! Just simple mixing, rolling, and wrapping. You got this!
- Giftable: Planning a potluck or need a thoughtful food gift? Pack a batch of these, and you’ll be the hero of the day.
- Crowd-pleasing: Who can resist the winning combo of cheesy beef, smoky BBQ, and crispy bacon? Absolutely no one! If you’re a fan of these easy handheld bites, you might also love our Garlic Parmesan Cheeseburger Bombs, they’re another fantastic option for any gathering.
Ingredients
Gather ’round, my sweet friends, let’s get our ingredients ready!
- 1 lb ground beef (80/20 blend): This is the star of our show! The 80/20 blend gives you just the right amount of fat for juicy, flavorful bombs.
- 1/2 cup barbecue sauce: Use your favorite! Whether it’s sweet, smoky, or a little spicy, it’ll infuse so much flavor into our beef.
- 1/2 cup grated sharp cheddar cheese: Sharp cheddar adds that amazing tangy, cheesy punch that makes these truly irresistible. Feel free to grate it yourself for the best melt!
- 1 tsp garlic powder: A kitchen staple that brings a warm, savory aroma.
- 1 tsp onion powder: Enhances the savory notes and pairs beautifully with the garlic.
- 1/4 tsp freshly cracked black pepper: Adds a little zing and freshness.
- 1/2 tsp kosher salt: Essential for balancing all those delicious flavors.
- 12 strips thick-cut bacon: Go for thick-cut! It crisps up so wonderfully and holds its shape around our little bombs.
- 12 toothpicks: Our trusty helpers to keep everything snug and secure while baking.
- Additional barbecue sauce for dipping (optional): Because you can never have too much BBQ flavor, right?
- Diced green onions for garnish (optional): A little pop of color and fresh oniony flavor at the end is always a good idea.
- Pickled jalapeños for extra flavor (optional): For those who love a little kick!
How to Make Cheesy BBQ Bacon Bombs
Alright, let’s get cooking! This is going to be so much fun, I promise.
- First things first, let’s get that oven warmed up! Preheat your oven to 375°F (190°C). You’ll want to line a baking sheet with foil or parchment paper – this makes cleanup a breeze! Then, place a wire rack on top. This little trick is key for getting that bacon super crispy all around.
- Now for the magic mixing bowl! In a large bowl, combine your ground beef, grated cheddar cheese, barbecue sauce, kosher salt, black pepper, garlic powder, and onion powder. Gently mix until everything is just combined. The secret here is not to overmix, or your meat might get a little tough, and we want tender, juicy bombs!
- Next, it’s time to shape them. Divide your meat mixture into 12 equal portions. I usually eyeball it, but you can always use a scale if you want them perfectly uniform. Roll each portion into a 1.5-inch diameter ball. Think of them as little cheesy, savory treasures!
- This is where the bacon comes in! Take one strip of thick-cut bacon and carefully wrap it around each meatball. You’ll want to slightly overlap the bacon to cover the entire ball snugly. Once it’s wrapped, secure it with a toothpick. Make sure that toothpick goes all the way through to hold everything in place.
- Arrange your beautiful bacon-wrapped meatballs on the prepared wire rack. Make sure there’s a little space between each one so they can crisp up nicely.
- Pop them into your preheated oven and bake for 20-25 minutes. About halfway through, I like to flip them over. This ensures that crispy bacon goodness on all sides! They’re done when the internal temperature reaches 160°F (71°C).
- Once they’re perfectly cooked, transfer those glorious bombs to a plate lined with paper towels. Let them rest for about 5 minutes. This helps redistribute the juices, keeping them super moist and delicious.
- Before serving, remember to remove all the toothpicks! Then, if you’re feeling fancy, drizzle with extra barbecue sauce and sprinkle with some fresh diced green onions or a few pickled jalapeños for an extra kick. Enjoy your delightful creations!
Substitutions & Additions
Cooking is all about making a recipe your own, right? Here are a few ideas to get your creative juices flowing:
- Cheese Swap: Not a cheddar fan? Try Monterey Jack, pepper jack for a spicy kick, or even a smoked gouda for a deeper flavor.
- Meat Alternatives: You can absolutely use ground turkey or chicken instead of beef for a lighter option. Or, if you love that breakfasty flavor, a mild ground sausage would be fantastic!
- Spice It Up: A pinch of smoked paprika, a dash of cayenne pepper, or even a sprinkle of your favorite chili powder can add new dimensions to the flavor.
- Hidden Surprises: For an extra cheesy core, press a small cube of cream cheese or a tiny chunk of mozzarella into the center of each meatball before rolling. A sliver of pickled jalapeño inside would also be a delicious surprise!
- Different Sauces: Experiment with different BBQ sauce flavors – a tangy Carolina Gold, a sweet honey BBQ, or a fiery habanero BBQ can totally change the game. For another fantastic BBQ and bacon combination, be sure to check out our Crispy BBQ Bacon Cheeseburger Tater Tot Bombs!
Tips for Success
I want you to have the most amazing experience making these, so here are a few little nuggets of wisdom:
- Don’t Overmix the Meat: I know I said it before, but it’s worth repeating! Overmixing can make your meatballs dense and tough. Mix just until everything is combined.
- Secure That Bacon: Make sure your bacon strips are wrapped tightly and secured well with a toothpick. This prevents them from unwrapping during baking, ensuring perfectly crispy coverage.
- The Wire Rack is Your Friend: Baking on a wire rack allows air to circulate around the bacon, giving you that ultimate crispy texture all the way around. Don’t skip it!
- Even Cooking Matters: Try to make your meatballs roughly the same size so they cook evenly. Uneven sizes mean some might be overcooked while others are still catching up.
- Prep Ahead: These are fantastic for meal prep! You can form the meatballs, wrap them in bacon, and even secure them with toothpicks, then place them in an airtight container in the fridge for up to 24 hours before baking. Just pull them out and bake when you’re ready!
How to Store Cheesy BBQ Bacon Bombs
If you’re lucky enough to have any leftovers (which, let’s be real, is a big “if”!), here’s how to keep them fresh:
- Refrigerator: Store any leftover Cheesy BBQ Bacon Bombs in an airtight container in the refrigerator for up to 3-4 days.
- Freezer: These also freeze wonderfully! Once completely cooled, place them in a single layer on a baking sheet to flash freeze for about an hour. Then, transfer them to a freezer-safe bag or container for up to 2-3 months. Thaw in the refrigerator overnight before reheating.
- Reheating: For the best results and to get that bacon crispy again, reheat in a preheated oven at 350°F (175°C) for about 10-15 minutes, or until warmed through. An air fryer also works wonders for reheating, giving them a lovely crispness in just a few minutes!
FAQs
Got questions? I’ve got answers!
Can I use a different type of ground meat?
Absolutely! Ground turkey or chicken work well for a lighter option. Just be aware they might be a little less juicy than beef, so ensure you don’t overcook them.
Can I make these ahead of time for a party?
Yes, you sure can! You can assemble the meatballs (with bacon and toothpicks) up to a day in advance and keep them covered in the refrigerator. Bake them right before your guests arrive for maximum freshness and crispiness!
How do I know the meatballs are cooked through?
The best way to know is to use a meat thermometer. Insert it into the center of a meatball; it should read 160°F (71°C) for safe consumption.
What kind of BBQ sauce works best?
That’s totally up to your taste buds! A classic sweet and smoky BBQ sauce is always a winner, but feel free to experiment with spicy, tangy, or even a honey BBQ for a different flavor profile.
For more delicious and easy recipes, make sure to follow us on Pinterest!

Cheesy BBQ Bacon Bombs
Ingredients
Equipment
Method
- Step 1: Preheat your oven to 375°F (190°C). Line a baking sheet with foil or parchment paper and place a wire rack on top for crispy bacon.
- Step 2: In a large bowl, gently combine the ground beef, grated cheddar cheese, barbecue sauce, kosher salt, black pepper, garlic powder, and onion powder until just mixed. Do not overmix.
- Step 3: Divide the meat mixture into 12 equal portions and roll each into a 1.5-inch diameter ball.
- Step 4: Take one strip of thick-cut bacon and carefully wrap it around each meatball, slightly overlapping to cover snugly. Secure with a toothpick, ensuring it goes all the way through.
- Step 5: Arrange the bacon-wrapped meatballs on the prepared wire rack, leaving a little space between each.
- Step 6: Bake for 20-25 minutes, flipping halfway through for even crispiness. They are done when the internal temperature reaches 160°F (71°C).
- Step 7: Transfer the cooked bombs to a plate lined with paper towels and let them rest for about 5 minutes.
- Step 8: Before serving, remember to remove all toothpicks! Drizzle with extra barbecue sauce and sprinkle with diced green onions or pickled jalapeños if desired. Enjoy!