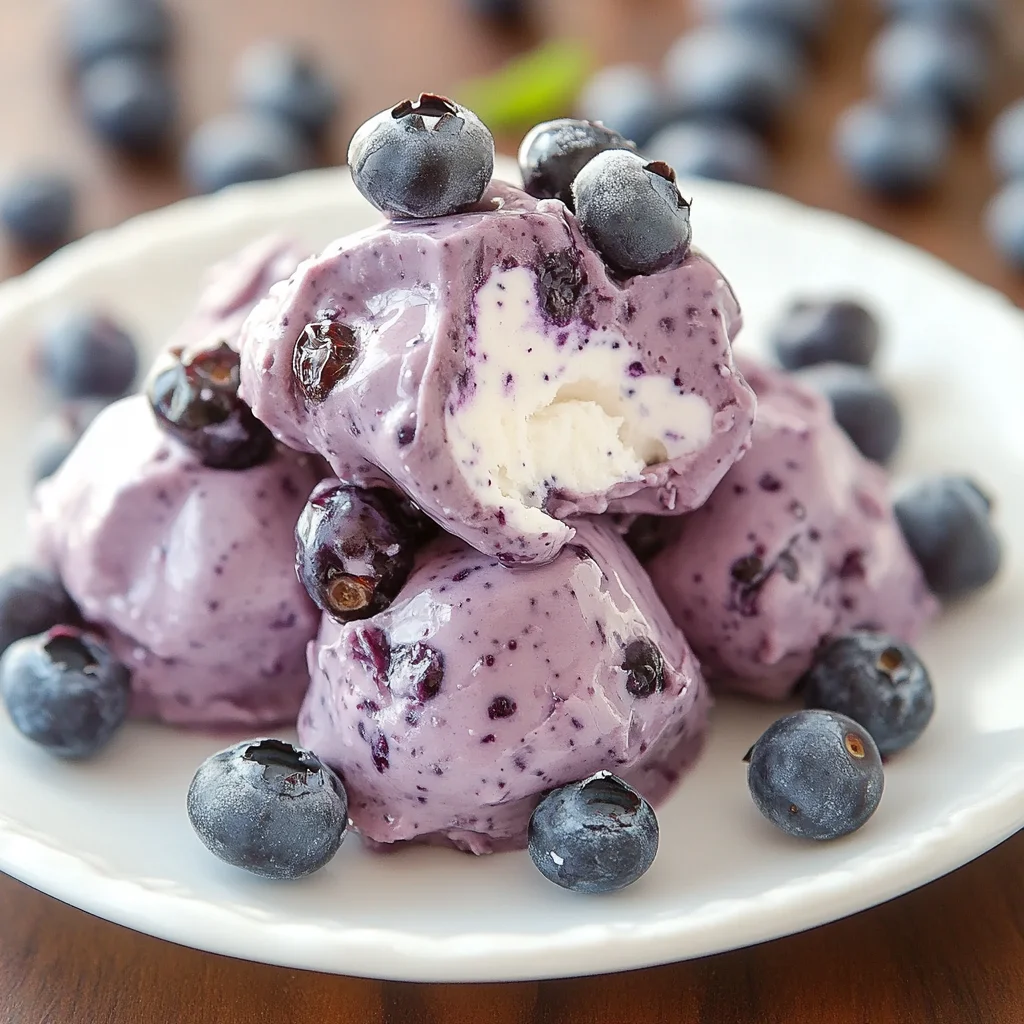
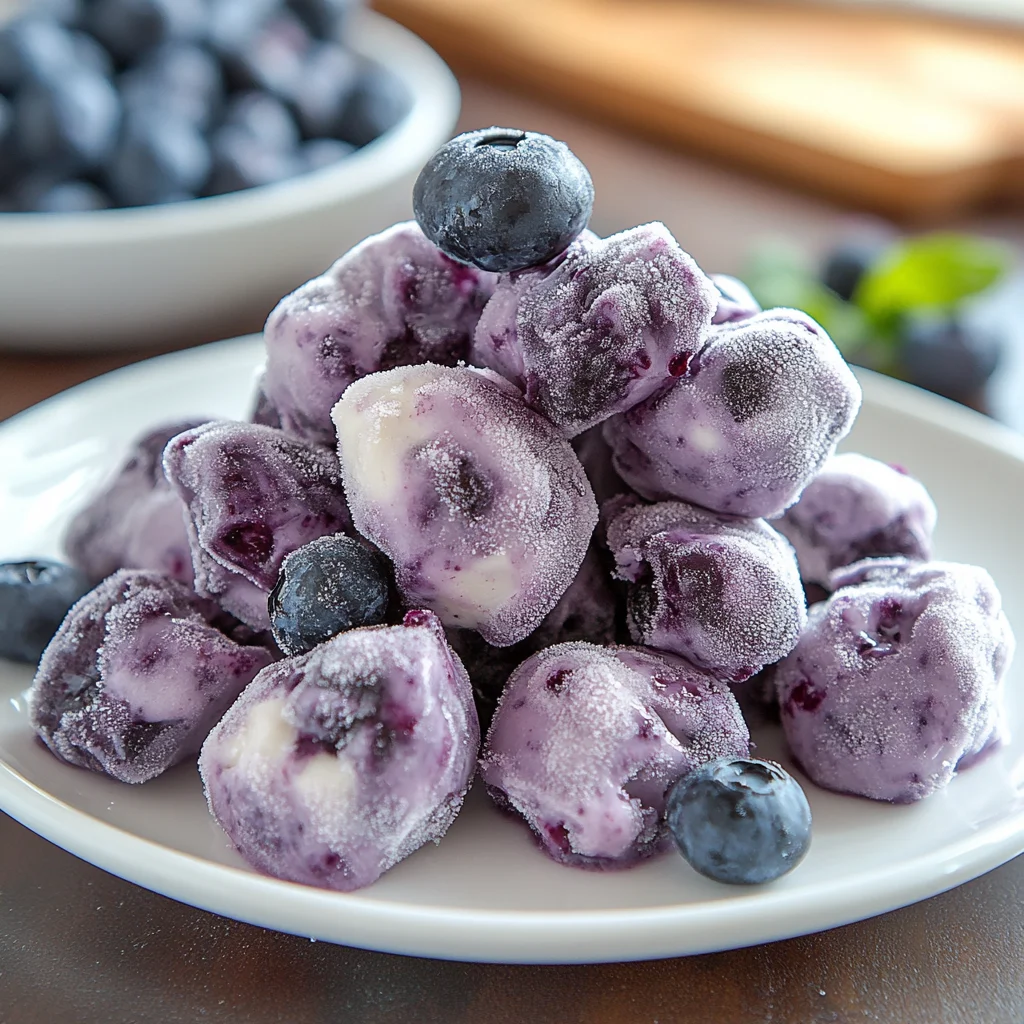
Hey there, my sweet friends! Summer is in full swing, and if you’re anything like me, you’re probably craving all the cool, refreshing treats without the fuss of baking. I mean, who wants to turn on the oven when the sun is shining? That’s where these incredible Frozen Blueberry Yogurt Clusters swoop in to save the day! They remind me of those simple, joyful summer afternoons, but with a grown-up twist that feels both indulgent and surprisingly wholesome. And honestly, if you’re anything like me and always on the hunt for quick, easy desserts that feel a little special, you might also adore these easy no-bake caramel pretzel bars for another sweet, crunchy treat!
These little bites of bliss are ridiculously easy to whip up, require zero baking, and are perfect for satisfying that sweet tooth without feeling heavy. They’re basically a dream come true for busy folks, kids (and grown-ups!) who want a healthy-ish snack, or anyone looking for a simple, memorable dessert. Plus, they’re like a more sophisticated cousin to those creamy blueberry Greek yogurt popsicles we all love on a hot day. Trust me, once you try them, you’ll wonder where they’ve been all your life!
Why You’ll Love Wholesome Frozen Blueberry Yogurt Clusters
- Fast: Ready in just a few steps, with minimal hands-on time.
- Easy: No fancy equipment or techniques required – just mix, freeze, and dip!
- Giftable: Pack them up in a cute box for a thoughtful hostess gift or a sweet surprise for a friend.
- Crowd-pleasing: Seriously, who doesn’t love blueberries and chocolate? These are always a hit!
Ingredients
Gathering your ingredients for these delightful clusters is super simple. You probably have most of them in your pantry already!
- 1 cup fresh blueberries: The star of our show! Bursting with natural sweetness and those lovely antioxidants. Make sure they’re fresh for the best texture.
- ½ cup chopped walnuts: For that satisfying crunch and a dose of healthy fats. They add a lovely nutty contrast to the sweet berries.
- ¾ cup 2-5% vanilla Greek yogurt: The creamy, tangy base that brings it all together. Greek yogurt adds that lovely protein boost and helps the clusters hold their shape beautifully.
- 1 ½ cups dark chocolate chips: Because everything’s better with chocolate, right? Dark chocolate adds a rich, slightly bitter note that balances the sweetness of the blueberries perfectly.
- 3 tablespoons coconut oil: Our secret weapon for a silky-smooth chocolate coating that hardens beautifully and gives a lovely sheen.
- Flaky salt (optional): Oh, trust me on this one! A tiny sprinkle elevates these to gourmet status, creating that irresistible sweet and salty combo.
How to Make Wholesome Frozen Blueberry Yogurt Clusters
Alright, let’s get to the good part! Making these clusters is practically foolproof, so let’s dive in.
- Prepare the Blueberry Yogurt Mixture: First things first, grab a baking sheet and line it with parchment paper. This is crucial for easy removal later. Now, in a medium bowl, gently combine your fresh blueberries, chopped walnuts, and the vanilla Greek yogurt. Mix everything together until the blueberries and walnuts are nicely coated. You want it to be well combined but still look like distinct pieces.
- Form and Freeze the Clusters: Time for the magic part! Using a regular spoon (or even a small cookie scoop if you want them super uniform), scoop out about 2 tablespoons of the mixture. Gently form them into little clusters – they don’t have to be perfect circles, rustic is charming! Place each cluster onto your parchment-lined baking sheet, making sure to leave a little space between each one so they don’t freeze together. Pop the whole tray into the freezer for about 1 to 1.5 hours, or until they’re nice and firm. This is important so they don’t fall apart when you dip them in chocolate.
- Melt the Chocolate: Approximately 10 minutes before your clusters are fully firm (set a timer so you don’t forget!), it’s time to get that chocolate ready. In a microwave-safe bowl, combine your dark chocolate chips and coconut oil. Heat them in 30-second intervals in the microwave, stirring well after each interval. Keep going until the mixture is completely smooth and glossy. Once melted, let the chocolate cool down for about 5 minutes. You don’t want it too hot, or it’ll melt your beautiful frozen clusters!
- Coat the Clusters: Okay, remove your firm, frozen clusters from the freezer. Now, using two forks (this is my go-to trick!), gently dip each cluster into the melted chocolate, making sure it’s completely coated. Let any excess chocolate drip off back into the bowl. Return the coated clusters to your parchment-lined baking sheet. If you’re using flaky salt, sprinkle it on immediately after dipping each cluster, before the chocolate hardens.
- Set and Store: Almost there! Place the chocolate-coated clusters back into the freezer or refrigerator for about 10 minutes. This will allow that glorious chocolate shell to harden up. Once they’re firm, you can transfer any remaining clusters into an airtight container. They’ll keep beautifully in the refrigerator for up to one week. Though, I bet they won’t last that long!
Substitutions & Additions
The beauty of these clusters is how adaptable they are! Feel free to play around with different flavors and textures to make them your own.
- Berries: Not a blueberry fan? No problem! Try fresh raspberries, sliced strawberries, or even a mix of your favorite berries. Just make sure to blot any excess moisture from fresh berries to prevent ice crystals.
- Nuts: Swap out the walnuts for almonds, pecans, pistachios, or even sunflower seeds if you need a nut-free option. Toasted nuts add an extra layer of flavor!
- Yogurt: While vanilla Greek yogurt is divine, plain Greek yogurt works too (you might want to add a teaspoon of honey or maple syrup for sweetness). Or, get creative with a lemon, strawberry, or even a coconut-flavored Greek yogurt. Dairy-free yogurts are also a fantastic option!
- Chocolate: Milk chocolate or white chocolate chips can be used instead of dark chocolate. For an even more decadent treat, you could even drizzle a second kind of chocolate on top once the first layer has set!
- Extra Toppings: Before the chocolate sets, sprinkle on some shredded coconut, a bit of granola for more crunch, mini chocolate chips, a tiny pinch of lemon zest for brightness, or even a drizzle of peanut butter.
Tips for Success
These clusters are super easy, but a few little tips can make them absolutely perfect every time!
- Firmness is Key: Don’t rush the initial freezing step for the yogurt clusters. They need to be truly firm (1 to 1.5 hours) before you dip them. If they’re too soft, they’ll melt into the warm chocolate and become a mess.
- Chocolate Temperature Matters: When melting your chocolate, remember the “cool for 5 minutes” step. Chocolate that’s too hot will immediately melt the frozen clusters, making them difficult to coat. It should be warm enough to be smooth and fluid, but not hot.
- Parchment Paper is Your Friend: Seriously, don’t skip this! It ensures your clusters won’t stick to the baking sheet and makes for super easy cleanup.
- Work Quickly: Once you take the clusters out of the freezer, the clock is ticking a little! Dip them one by one, and if you’re adding salt, do it right away before the chocolate sets. If the clusters start to soften, pop them back in the freezer for a few minutes.
How to Store Wholesome Frozen Blueberry Yogurt Clusters
These clusters are best enjoyed chilled, and they store wonderfully, making them a great prep-ahead snack!
- Refrigerator: You can keep them in an airtight container in the refrigerator for up to one week. They will be a little softer than when they are fresh from the freezer, but still delicious!
- Freezer: For the best firm, snack-like texture, store them in an airtight container in the freezer for up to 2-3 weeks. They won’t freeze rock solid due to the yogurt and chocolate, so they’ll be ready to enjoy straight from the freezer for a super refreshing treat!
FAQs
Got questions? I’ve got answers!
Q: Can I use frozen blueberries instead of fresh?
A: Yes, you can! Just make sure to thaw them completely and pat them very dry with a paper towel before mixing. This prevents excess moisture from making your clusters icy or watery.
Q: Is regular yogurt okay instead of Greek yogurt?
A: Greek yogurt is highly recommended because its thicker consistency helps the clusters hold their shape better. Regular yogurt might make the clusters a bit too soft and difficult to form. If you do use regular yogurt, make sure it’s thick and possibly strain it slightly if it’s very thin.
Q: Are these clusters healthy?
A: They are definitely on the healthier side for a sweet treat! Packed with antioxidants from blueberries, protein from Greek yogurt, healthy fats from walnuts, and the benefits of dark chocolate, they make a great guilt-free snack or light dessert. And speaking of simple fruit and yogurt delights, if you’re looking for another quick breakfast or snack idea, check out Grandma’s 3-ingredient berry yogurt parfait for another winner.
Q: How long do they take to harden in the freezer after dipping?
A: Usually, about 10 minutes in the freezer is enough for the chocolate shell to harden up. If your freezer is very cold, it might be even faster!
For more delicious and easy recipes, be sure to follow us on Pinterest!
Summer’s Sweetest Secret: Wholesome Frozen Blueberry Yogurt Clusters (So Easy!)
Hey there, my sweet friends! Summer is in full swing, and if you’re anything like me, you’re probably craving all the cool, refreshing treats without the fuss of baking. I mean, who wants to turn on the oven when the sun is shining? That’s where these incredible Frozen Blueberry Yogurt Clusters swoop in to save the day! They remind me of those simple, joyful summer afternoons, but with a grown-up twist that feels both indulgent and surprisingly wholesome. And honestly, if you’re anything like me and always on the hunt for quick, easy desserts that feel a little special, you might also adore these easy no-bake caramel pretzel bars for another sweet, crunchy treat!
These little bites of bliss are ridiculously easy to whip up, require zero baking, and are perfect for satisfying that sweet tooth without feeling heavy. Plus, they’re like a more sophisticated cousin to those creamy blueberry Greek yogurt popsicles we all love on a hot day. Trust me, once you try them, you’ll wonder where they’ve been all your life!
Why You’ll Love Wholesome Frozen Blueberry Yogurt Clusters
- Fast
- Easy
- Giftable
- Crowd-pleasing
Ingredients
Gathering your ingredients for these delightful clusters is super simple. You probably have most of them in your pantry already!
- 1 cup fresh blueberries: The star of our show! Bursting with natural sweetness and those lovely antioxidants. Make sure they’re fresh for the best texture.
- ½ cup chopped walnuts: For that satisfying crunch and a dose of healthy fats. They add a lovely nutty contrast to the sweet berries.
- ¾ cup 2-5% vanilla Greek yogurt: The creamy, tangy base that brings it all together. Greek yogurt adds that lovely protein boost and helps the clusters hold their shape beautifully.
- 1 ½ cups dark chocolate chips: Because everything’s better with chocolate, right? Dark chocolate adds a rich, slightly bitter note that balances the sweetness of the blueberries perfectly.
- 3 tablespoons coconut oil: Our secret weapon for a silky-smooth chocolate coating that hardens beautifully and gives a lovely sheen.
- Flaky salt (optional): Oh, trust me on this one! A tiny sprinkle elevates these to gourmet status, creating that irresistible sweet and salty combo.
How to Make Wholesome Frozen Blueberry Yogurt Clusters
Alright, let’s get to the good part! Making these clusters is practically foolproof, so let’s dive in.
- Prepare the Blueberry Yogurt Mixture: First things first, grab a baking sheet and line it with parchment paper. This is crucial for easy removal later. Now, in a medium bowl, gently combine your fresh blueberries, chopped walnuts, and the vanilla Greek yogurt. Mix everything together until the blueberries and walnuts are nicely coated. You want it to be well combined but still look like distinct pieces.
- Form and Freeze the Clusters: Time for the magic part! Using a regular spoon (or even a small cookie scoop if you want them super uniform), scoop out about 2 tablespoons of the mixture. Gently form them into little clusters – they don’t have to be perfect circles, rustic is charming! Place each cluster onto your parchment-lined baking sheet, making sure to leave a little space between each one so they don’t freeze together. Pop the whole tray into the freezer for about 1 to 1.5 hours, or until they’re nice and firm. This is important so they don’t fall apart when you dip them in chocolate.
- Melt the Chocolate: Approximately 10 minutes before your clusters are fully firm (set a timer so you don’t forget!), it’s time to get that chocolate ready. In a microwave-safe bowl, combine your dark chocolate chips and coconut oil. Heat them in 30-second intervals in the microwave, stirring well after each interval. Keep going until the mixture is completely smooth and glossy. Once melted, let the chocolate cool down for about 5 minutes. You don’t want it too hot, or it’ll melt your beautiful frozen clusters!
- Coat the Clusters: Okay, remove your firm, frozen clusters from the freezer. Now, using two forks (this is my go-to trick!), gently dip each cluster into the melted chocolate, making sure it’s completely coated. Let any excess chocolate drip off back into the bowl. Return the coated clusters to your parchment-lined baking sheet. If you’re using flaky salt, sprinkle it on immediately after dipping each cluster, before the chocolate hardens.
- Set and Store: Almost there! Place the chocolate-coated clusters back into the freezer or refrigerator for about 10 minutes. This will allow that glorious chocolate shell to harden up. Once they’re firm, you can transfer any remaining clusters into an airtight container. They’ll keep beautifully in the refrigerator for up to one week. Though, I bet they won’t last that long!
Substitutions & Additions
The beauty of these clusters is how adaptable they are! Feel free to play around with different flavors and textures to make them your own.
- Berries: Not a blueberry fan? No problem! Try fresh raspberries, sliced strawberries, or even a mix of your favorite berries. Just make sure to blot any excess moisture from fresh berries to prevent ice crystals.
- Nuts: Swap out the walnuts for almonds, pecans, pistachios, or even sunflower seeds if you need a nut-free option. Toasted nuts add an extra layer of flavor!
- Yogurt: While vanilla Greek yogurt is divine, plain Greek yogurt works too (you might want to add a teaspoon of honey or maple syrup for sweetness). Or, get creative with a lemon, strawberry, or even a coconut-flavored Greek yogurt. Dairy-free yogurts are also a fantastic option!
- Chocolate: Milk chocolate or white chocolate chips can be used instead of dark chocolate. For an even more decadent treat, you could even drizzle a second kind of chocolate on top once the first layer has set!
- Extra Toppings: Before the chocolate sets, sprinkle on some shredded coconut, a bit of granola for more crunch, mini chocolate chips, a tiny pinch of lemon zest for brightness, or even a drizzle of peanut butter.
Tips for Success
These clusters are super easy, but a few little tips can make them absolutely perfect every time!
- Firmness is Key: Don’t rush the initial freezing step for the yogurt clusters. They need to be truly firm (1 to 1.5 hours) before you dip them. If they’re too soft, they’ll melt into the warm chocolate and become a mess.
- Chocolate Temperature Matters: When melting your chocolate, remember the “cool for 5 minutes” step. Chocolate that’s too hot will immediately melt the frozen clusters, making them difficult to coat. It should be warm enough to be smooth and fluid, but not hot.
- Parchment Paper is Your Friend: Seriously, don’t skip this! It ensures your clusters won’t stick to the baking sheet and makes for super easy cleanup.
- Work Quickly: Once you take the clusters out of the freezer, the clock is ticking a little! Dip them one by one, and if you’re adding salt, do it right away before the chocolate sets. If the clusters start to soften, pop them back in the freezer for a few minutes.
How to Store Wholesome Frozen Blueberry Yogurt Clusters
These clusters are best enjoyed chilled, and they store wonderfully, making them a great prep-ahead snack!
- Refrigerator: You can keep them in an airtight container in the refrigerator for up to one week. They will be a little softer than when they are fresh from the freezer, but still delicious!
- Freezer: For the best firm, snack-like texture, store them in an airtight container in the freezer for up to 2-3 weeks. They won’t freeze rock solid due to the yogurt and chocolate, so they’ll be ready to enjoy straight from the freezer for a super refreshing treat!
FAQs
Got questions? I’ve got answers!
Q: Can I use frozen blueberries instead of fresh?
A: Yes, you can! Just make sure to thaw them completely and pat them very dry with a paper towel before mixing. This prevents excess moisture from making your clusters icy or watery.
Q: Is regular yogurt okay instead of Greek yogurt?
A: Greek yogurt is highly recommended because its thicker consistency helps the clusters hold their shape better. Regular yogurt might make the clusters a bit too soft and difficult to form. If you do use regular yogurt, make sure it’s thick and possibly strain it slightly if it’s very thin.
Q: Are these clusters healthy?
A: They are definitely on the healthier side for a sweet treat! Packed with antioxidants from blueberries, protein from Greek yogurt, healthy fats from walnuts, and the benefits of dark chocolate, they make a great guilt-free snack or light dessert. And speaking of simple fruit and yogurt delights, if you’re looking for another quick breakfast or snack idea, check out Grandma’s 3-ingredient berry yogurt parfait for another winner.
Q: How long do they take to harden in the freezer after dipping?
A: Usually, about 10 minutes in the freezer is enough for the chocolate shell to harden up. If your freezer is very cold, it might be even faster!
For more delicious and easy recipes, be sure to follow us on Pinterest!

Wholesome Frozen Blueberry Yogurt Clusters
Ingredients
Equipment
Method
- Step 1: Prepare the Blueberry Yogurt Mixture. Line a baking sheet with parchment paper. In a medium bowl, gently combine fresh blueberries, chopped walnuts, and vanilla Greek yogurt. Mix until well combined.
- Step 2: Form and Freeze the Clusters. Scoop about 2 tablespoons of the mixture using a regular spoon (or a small cookie scoop). Gently form them into clusters and place each onto the parchment-lined baking sheet, leaving space between them. Freeze for 1 to 1.5 hours, or until nice and firm.
- Step 3: Melt the Chocolate. Approximately 10 minutes before clusters are fully firm, combine dark chocolate chips and coconut oil in a microwave-safe bowl. Heat in 30-second intervals, stirring after each, until the mixture is completely smooth and glossy. Let cool for about 5 minutes.
- Step 4: Coat the Clusters. Remove firm, frozen clusters from the freezer. Using two forks, gently dip each cluster into the melted chocolate, making sure it’s completely coated. Let any excess chocolate drip off back into the bowl. Return the coated clusters to your parchment-lined baking sheet. If you're using flaky salt, sprinkle it on immediately after dipping each cluster, before the chocolate hardens.
- Step 5: Set and Store. Place the chocolate-coated clusters back into the freezer or refrigerator for about 10 minutes. This will allow the chocolate shell to harden up. Once they're firm, transfer any remaining clusters into an airtight container. They'll keep beautifully in the refrigerator for up to one week, or in the freezer for up to 2-3 weeks for the best firm, snack-like texture.