

Oh, friend, there are few things in this world that bring as much comfort and joy as the smell of fresh bread baking in your kitchen. It instantly transports you to a cozy, happy place, doesn’t it? For me, it conjures up memories of grandma’s kitchen, where warmth and incredible aromas were always abundant. But let’s be real, making artisan bread can sometimes feel intimidating, right? All that kneading, proofing, and wondering if you’re doing it “right.” Well, I’m here to tell you that this Roasted Garlic Rosemary Artisan Bread recipe is about to change your world!
This isn’t just any bread; it’s a game-changer. Imagine a crusty exterior giving way to a soft, chewy interior, bursting with the sweet, mellow flavor of roasted garlic and the aromatic earthiness of fresh rosemary. And the best part? It’s incredibly easy to make, a true no-knead wonder! It feels gourmet, tastes incredible, and comes together with minimal fuss, leaving you more time to savor those delicious moments. If you’re looking for simple yet show-stopping recipes, you’ll find plenty more inspiration among all our easy recipes right here.
Why You’ll Love Roasted Garlic Rosemary Artisan Bread
- Fast (Hands-On Time): While it needs some rise time, your actual effort is super minimal.
- Easy: Seriously, no complex techniques or heavy kneading required. It practically makes itself!
- Giftable: Wrap up a warm loaf, and you’ve got the perfect homemade gift for any occasion.
- Crowd-Pleasing: Who doesn’t love the irresistible combination of garlic and rosemary in a warm, crusty bread?
Ingredients
Gather your simple treasures from the pantry and fridge. Here’s what you’ll need for this rustic masterpiece:
- 1 whole head garlic: This is the star! Roasting it transforms those pungent cloves into sweet, buttery pockets of flavor. Don’t skip this step!
- 1 tablespoon extra-virgin olive oil (divided): A good quality olive oil adds richness and helps crisp up that beautiful crust.
- Coarse sea salt & freshly ground black pepper: Just a little sprinkle to season your garlic as it roasts, enhancing its natural sweetness.
- 1½ cups water (room temperature, ~70°F / 21°C): The perfect temperature for waking up your yeast. Think lukewarm, not hot or cold.
- 1 teaspoon active dry yeast: The magical ingredient that makes your bread light and airy. Make sure it’s fresh!
- 3 cups bread or all-purpose flour (plus more for dusting): Bread flour gives a chewier crumb, but all-purpose works beautifully too for a slightly softer loaf.
- ½ teaspoon dried oregano: A subtle herbaceous note that complements the garlic and rosemary.
- 1 teaspoon kosher or fine sea salt: Crucial for flavor! Don’t skimp on the salt, it brings everything to life.
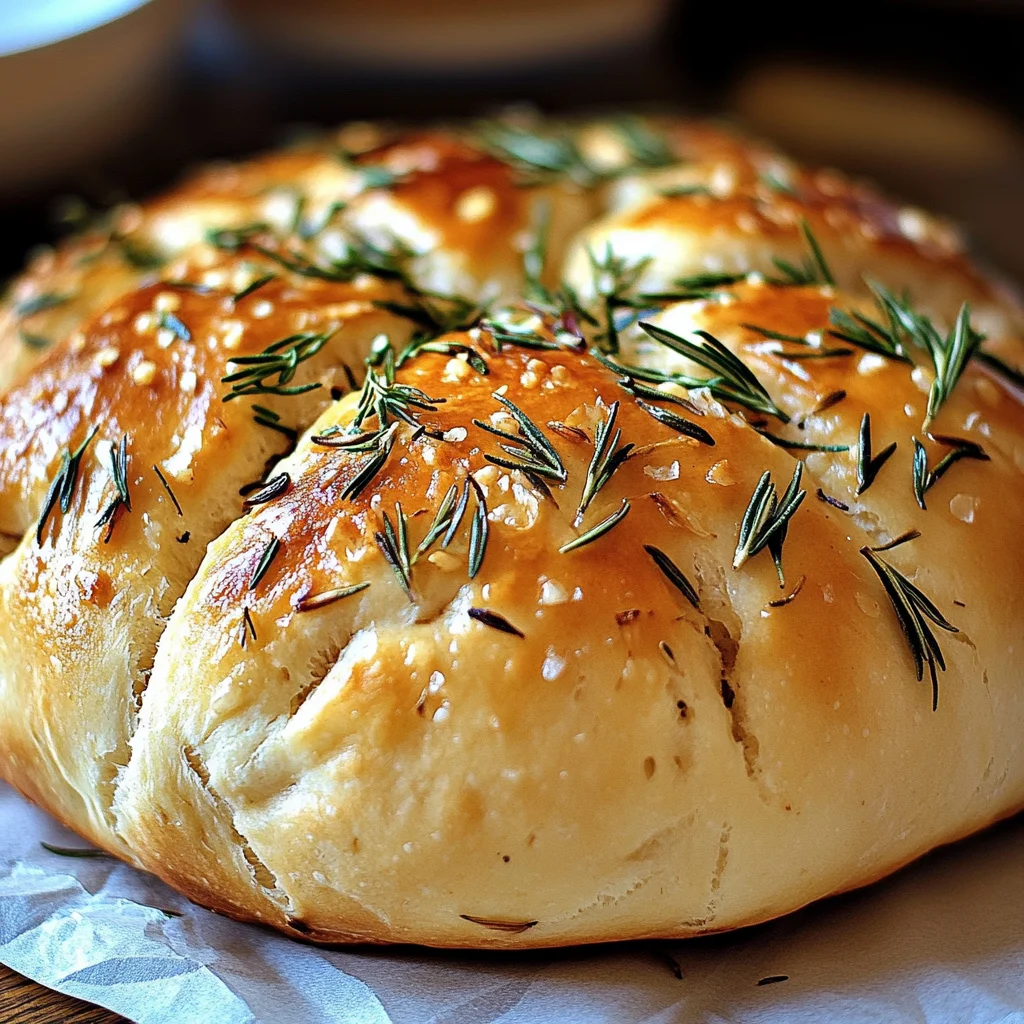
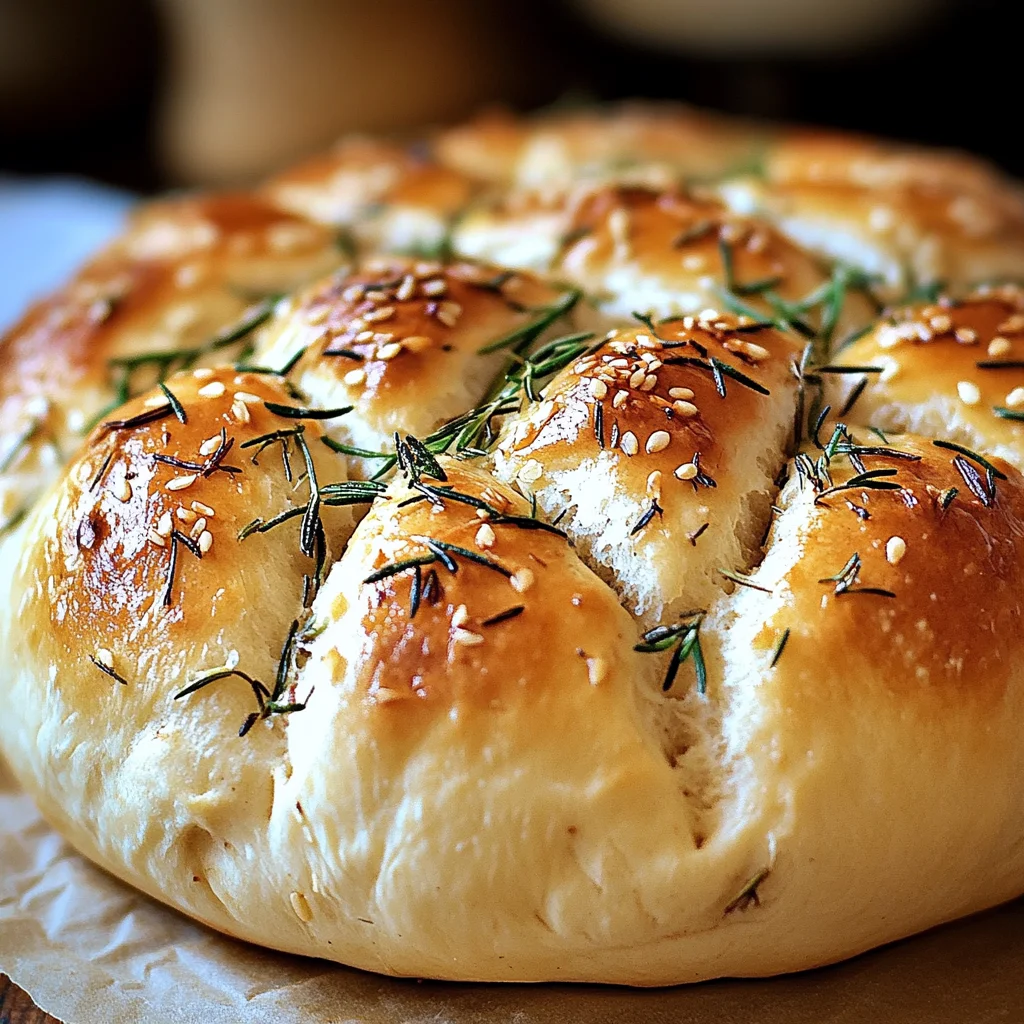
- 2 teaspoons finely chopped fresh rosemary (plus more for topping): Fresh is key here for that vibrant, piney aroma and flavor. It truly makes the bread sing!
How to Make Roasted Garlic Rosemary Artisan Bread
Let’s get baking! You’ll be amazed at how simple it is to create this bakery-worthy loaf right in your own kitchen.
1. Roast the Garlic
First things first, let’s get that garlic smelling amazing! Preheat your oven to a cozy 400°F (204°C). Grab that whole head of garlic and carefully slice it in half horizontally, exposing all those beautiful cloves. Now, drizzle the cut sides generously with a portion of your olive oil. A little coarse sea salt and freshly ground black pepper go a long way here to bring out the garlic’s best. Wrap your garlic halves snugly in foil, like little presents, and pop them into the preheated oven. Let them roast for about 40 minutes, until they’re super soft and fragrant. Once they’re done, let them cool down just enough so you can handle them, then squeeze those soft, mashed cloves right out of their skins. Oh, the aroma alone is divine!
2. Mix the Dough
Now for the dough! In a small bowl, combine your room temperature water and active dry yeast. Give it a gentle stir and let it hang out for 10-15 minutes. You’re looking for a foamy top – that’s how you know your yeast is alive and ready to party! While your yeast is blooming, grab a large mixing bowl. Add your bread or all-purpose flour, kosher or fine sea salt, dried oregano, and that lovely finely chopped fresh rosemary. Give these dry ingredients a good whisk to combine. Now, pour in your foamy yeast mixture, add the mashed roasted garlic you just prepared, and the remaining olive oil. Grab a spatula and mix everything together until you have a sticky, shaggy dough. Resist the urge to knead! We’re going for a no-knead masterpiece here, remember?
3. First Rise (The Long Nap)
Cover your bowl with a clean kitchen towel. This is where the magic happens and the dough does all the work! Let it rise at room temperature for a good 8-10 hours, or until it has happily doubled in size. I often like to start this in the morning so it’s ready for its next step by evening, or start it before bed and let it rise overnight. It’s truly a “set it and forget it” kind of process!
4. Shape and Cold Ferment (Flavor Boost!)
Time for a quick shaping session! Lightly flour a clean work surface. Gently turn your beautiful, bubbly dough out onto the floured surface. With floured hands, gently shape it into a loose ball. Don’t worry about perfection; just a gentle round is all you need. Now, place the dough seam-side up into a floured proofing bowl or basket. If you don’t have one, a regular bowl lined with a floured kitchen towel works great! Cover it up and pop it into the refrigerator for 1-24 hours. If you can, let it chill for up to 48 hours; that cold ferment time really develops a deeper, more complex flavor. Trust me, it’s worth the wait!
5. Preheat Oven & Score
When you’re ready to bake, about an hour before, preheat your oven to a scorching 450°F (232°C). Make sure to place your Dutch oven (with its lid!) inside the oven while it preheats. This is crucial for getting that amazing crispy crust! Once your oven and Dutch oven are screaming hot, carefully remove the dough from the refrigerator. Invert the dough onto a piece of parchment paper, so the seam-side is now facing down. Using a super sharp blade (a bread lame or a razor blade works best, but a sharp knife will do), make a score or slash on the top surface of the dough. This allows the bread to expand beautifully as it bakes.
6. Bake!
This is the exciting part! Carefully, and I mean carefully because that Dutch oven is HOT, transfer the dough along with the parchment paper into the preheated Dutch oven. Pop the lid back on and slide it back into the oven. Bake for 30 minutes. After 30 minutes, remove the lid (again, carefully!) and continue baking for an additional 15-20 minutes, or until your loaf is a gorgeous golden brown and sounds hollow when you tap its bottom. The aroma filling your kitchen right now is probably making your mouth water!
7. Cool & Slice
The hardest part of all: waiting! Carefully remove the bread from the Dutch oven and transfer it to a wire rack to cool completely. I know, I know, it’s tempting to dive right in, but allowing it to cool for at least 1 hour before slicing is super important. It lets the internal structure set and prevents a gummy crumb. Once cooled, slice into thick pieces and prepare to be amazed!
Substitutions & Additions
This recipe is incredibly versatile, so feel free to play around with it!
- Garlic: If you’re really short on time, you can use 1-2 tablespoons of minced garlic (sautéed gently for a few minutes to mellow it) instead of roasting a whole head, but the roasted flavor is truly superior.
- Herbs: Not a rosemary fan? Try fresh thyme, chives, or a mix of Italian herbs.
- Flour: You can experiment with adding a small amount of whole wheat flour (¼ to ½ cup) for a nuttier flavor and denser texture.
- Cheesy Goodness: Stir in ½ cup of shredded Parmesan or Gruyere cheese when you mix the dough for an even richer flavor. It’s delightful! For another cheesy favorite, you might love our cheesy garlic chicken wraps!
- Extra Add-ins: Consider adding a handful of chopped sun-dried tomatoes, olives, or even a sprinkle of red pepper flakes for a little kick.
Tips for Success
Even though this is an easy recipe, a few little pointers can make sure your bread turns out perfect every time!
- Yeast Activation is Key: Make sure your water is room temperature and your yeast foams up. This is your green light! If it doesn’t foam, your yeast might be old, and it’s best to start with a fresh packet.
- Don’t Rush the Rise: The long rise is essential for flavor development and texture. Patience is a virtue in bread making!
- No-Knead Means No-Fuss: Resist the urge to overmix or knead. The sticky dough will develop gluten on its own with time.
- Dutch Oven Magic: The preheated Dutch oven creates a steamy environment that gives you that incredible, crispy crust. If you don’t have one, you can bake on a baking stone or sheet pan with a tray of hot water on the bottom rack for steam, but the Dutch oven truly is a game-changer.
- Cool Completely: As hard as it is, letting the bread cool completely ensures a proper texture. Slicing too early can make it gummy inside.
- Serving Suggestion: This bread is fantastic on its own with a little butter, perfect for dipping in olive oil and balsamic vinegar, or as a side to a hearty meal. It pairs wonderfully with a pasta dish like our savory garlic butter chicken bites with lemon parmesan spaghetti!
How to Store Roasted Garlic Rosemary Artisan Bread
Once your beautiful loaf has cooled and you’ve enjoyed a few slices (or several, no judgment here!), you’ll want to store any leftovers properly.
- Countertop: For up to 2-3 days, store your bread at room temperature in an airtight container or a bread bag. A paper bag can also work if you prefer a crispier crust, but it will dry out faster.
- Freezing: This bread freezes wonderfully! Once completely cooled, slice the bread (or keep it whole if you prefer) and wrap it tightly in plastic wrap, then an extra layer of aluminum foil. It will keep in the freezer for up to 2-3 months. To enjoy, simply thaw at room temperature, or for a “just baked” feel, warm slices in the oven or toaster.
FAQs
Q: Can I use instant yeast instead of active dry yeast?
A: Yes, you absolutely can! If using instant yeast, you don’t need to dissolve it in water first. Just add it directly to your dry ingredients with the flour, then proceed with the recipe, adding the water and other wet ingredients. The rise time might be a little shorter, so keep an eye on your dough!
Q: My dough isn’t rising. What went wrong?
A: The most common culprit is inactive yeast or water that’s too hot or too cold. Ensure your water is around 70°F (21°C) and that your yeast is fresh (check the expiry date!). Also, make sure your kitchen isn’t too cold during the first rise, as a warm environment helps the yeast do its job.
Q: Do I really need a Dutch oven?
A: While a Dutch oven is highly recommended for achieving that signature artisan crust, it’s not strictly necessary. You can bake it on a baking stone or a heavy baking sheet. To create steam, you can place a pan of hot water on the bottom rack of your oven while the bread bakes. The steam is what helps the crust stay pliable and expand before it crisps up.
Q: Can I skip the cold fermentation?
A: Yes, you can. If you’re in a hurry, you can proceed straight to baking after the first rise. However, the cold fermentation step significantly enhances the flavor and complexity of the bread, giving it that true artisan depth. It’s a flavor booster you won’t want to miss if you have the time!
I truly hope you enjoy making (and devouring!) this Roasted Garlic Rosemary Artisan Bread as much as I do. It’s a recipe that feels fancy but is wonderfully forgiving, perfect for both seasoned bakers and kitchen newbies. Happy baking, friends!
For more delicious inspiration, be sure to follow us on Pinterest!
Easy Roasted Garlic Rosemary Artisan Bread
Ingredients
Equipment
Method
- Step 1: Preheat oven to 400°F (204°C). Slice the whole head of garlic in half horizontally. Drizzle the cut sides generously with a portion of the olive oil. Season with coarse sea salt and freshly ground black pepper. Wrap snugly in foil and roast in the preheated oven for about 40 minutes, until soft and fragrant. Let cool slightly, then squeeze out the mashed cloves.
- Step 2: In a small bowl, combine room temperature water and active dry yeast. Stir gently and let sit for 10-15 minutes until foamy. In a large mixing bowl, whisk together flour, kosher or fine sea salt, dried oregano, and finely chopped fresh rosemary. Pour in the foamy yeast mixture, add the mashed roasted garlic, and the remaining olive oil. Mix with a spatula until a sticky, shaggy dough forms; do not knead.
- Step 3: Cover the bowl with a clean kitchen towel and let the dough rise at room temperature for 8-10 hours, or until doubled in size.
- Step 4: Lightly flour a clean work surface. Gently turn the dough out and shape it into a loose ball with floured hands. Place the dough seam-side up into a floured proofing bowl or a regular bowl lined with a floured kitchen towel. Cover and refrigerate for 1-24 hours (up to 48 hours for deeper flavor).
- Step 5: One hour before baking, preheat your oven to 450°F (232°C) with your Dutch oven (with its lid) inside. Carefully remove the dough from the refrigerator and invert it onto a piece of parchment paper (seam-side down). Use a sharp blade to make a score or slash on the top surface of the dough.
- Step 6: Carefully transfer the dough with the parchment paper into the preheated Dutch oven. Cover with the lid and bake for 30 minutes. After 30 minutes, carefully remove the lid and continue baking for an additional 15-20 minutes, or until golden brown and hollow-sounding when tapped.
- Step 7: Carefully remove the bread from the Dutch oven and transfer it to a wire rack to cool completely for at least 1 hour before slicing. Slice and serve immediately.


